Hosts
After reading the previous dataflow section, it is now clear we have to go through the dataflow steps to get from collecting data to sending out alerts. The first part of the dataflow is to create a host, so that is what we are now going to tackle in this part.
Creating a host
As we mentioned, Hosts in Zabbix are nothing more than a container (not the
Docker kind). They contain our Items, Triggers, graphs, Low Level
Discovery rules and Web scenarios.
At this point, we should create our first monitoring host in Zabbix. Navigate to
Data collection | Hosts and in the top right corner click on the Create
host button. This will open up the following modal window:
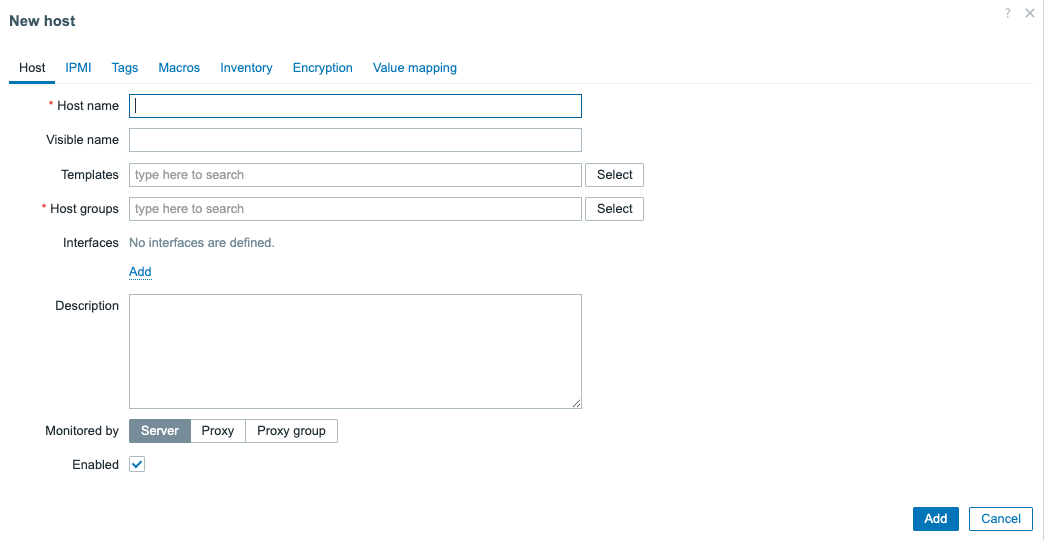 4.4 Empty
host creation window
4.4 Empty
host creation window
There are a lot of fields we can fill in, but few are important to note here specifically.
- Host name
- Host groups
These are the only two mandatory fields in the host creation window. If we fill these two, we can create our host.
Host name
The Host name is very important. It functions as both the technical name of
the host we will use in various different locations, but it is also used as the
Visible name by default. This means that we will work with this name to find
this host with its associated data through filters .
Make sure to select a host name that is short and descriptive. For example:
a few good host names
linux-srv01-prdwww.thezabbixbook.comdocker-container-42db-srv10 - Website database
The best practise is to keep the host name the same in Zabbix as it is configured on your monitoring target. The monitoring target, being whatever you are trying to monitor. Whether that is a physical or virtual server, a website, a database server or a specific database on that database server. Every host in Zabbix is a monitoring target, i.e. something you are trying to monitor.
Visible name
Now, we didn't mention it as it is not a mandatory field. Nevertheless, we need
to discuss the Visible name field before we continue with the Host groups.
Although not mandatory, as I mentioned, the Host name is automatically used as
the visible name when not filled in.
Many of us see a form style list and have the need to fill out everything there is to fill out. This should not be the case with forms like the host creation window in Zabbix. We are only trying to fill out everything we should be configuring. As such, since the visible name is not mandatory, I do not fill it out. Unless, there is an actual need to use the field.
The visible name was added in Zabbix as the host name and visible name fields in Zabbix use different character encoding in the Zabbix database.
Host name = UTF8 and supports alphanumeric, dashes, underscores and spaces
(not leading or trailing). Visible name = UTF8_MB4 and supports special
characters like ç and even emojis like 👀.
This is the main difference. When you want to use a local language for example you could do:
Host name = sherbimi-central Visible name = shërbimi-çentral
That way you keep your local language in the frontend, but the technical name doesn't include the special character. Keep in mind however, that this can create confusion. You now need to remember two different names for the same host. As such, visible names are only recommended when you really need them or if you are trying to work around something. Otherwise, there is no need to use them.
Host groups
In Chapter 02 of the book, we had
a deep dive into setting up various different host groups to keep our Zabbix
environment structured. When we create a host, we can now start using one of our
created host groups. Keep in mind, to only add the host to the lowest level of
the subgroups. For example when we have Servers and Servers/Linux, we will
only add our host to Servers/Linux.
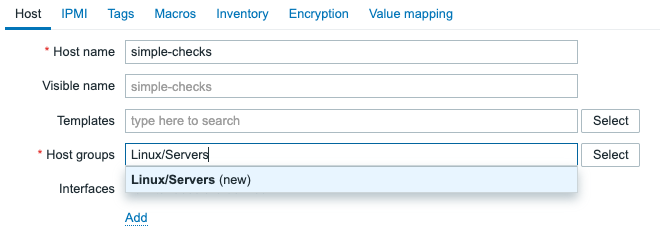
It's also possible to create a host straight from the host creation window. To
do so, simply start typing the host group name into the Host groups field and
it will ask you if you want to create the host group.
Let's add the host simple-checks in the Linux/Servers host group:
 {
align=center }
{
align=center }
4.5 Host creation - new host group
And this is it for creating our first host in Zabbix. We can leave the rest of
the fields empty as they are optional. Another very important element of a host
is the interfaces field, but we will cover that in a later section. Finally
click on the Add button to create the host.
Conclusion
In this section we have learned how to create a host in Zabbix. We have covered
the important fields like Host name, Visible name and Host groups. We have
also discussed best practices around naming conventions for hosts in Zabbix and
when to use the visible name field. Finally, we created our first host called
simple-checks in the Linux/Servers host group, which we will use in the next
section to create our first items.
Questions
- What is the purpose of a host in Zabbix?
- What is the difference between the "Host name" and "Visible name" fields when creating a host?
- Why is it recommended to only add a host to the lowest level of subgroups when assigning host groups?