SSH / Telnet
Let's say you have a device that doesn't support SNMP, there is no API and it's just not exposing any data (or just the data you need) via any protocol. However, you are able to login to the device and you are able to execute commands through the SSH or Telnet terminal. In this case Zabbix can still provide you with a solid option to monitor the device.
Zabbix provides us with the option to set up a remote connection through SSH or Telnet and execute any command we'd normally execute ourselves manually. We can then use our preprocessing rules and other methods to parse this information and create valuable monitoring metrics from it.
Security
Please keep in mind that Telnet sends Usernames/Passwords unencrypted over your network. This means that it is not considered a secure connection and as such it should not be used. However, if you have a device that only exposes data via Telnet, Zabbix still provides you with the option to use the protocol at your own risk.
SSH Monitoring
Let's start with the most used method, SSH. Since this is a secure encrypted connection, it is often times used to get data from devices that do not expose it via other protocols. However, our favourite use case for SSH monitoring is to get data from devices that do have SNMP or an API, but only expose certain data through the CLI. This gives you another option in gathering information you need that the vendor might not have properly exposed.
In our Zabbix frontend, let's navigate to Monitoring | Hosts and create a new host for SSH and Telnet monitoring. Let's call it cli-monitoring and put it in the hostgroup XYZ.
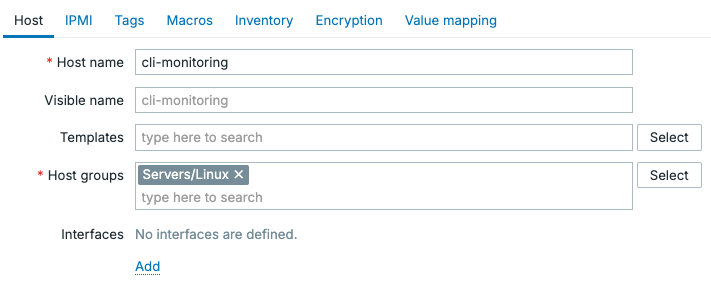 4.xx Zabbix CLI Monitoring host
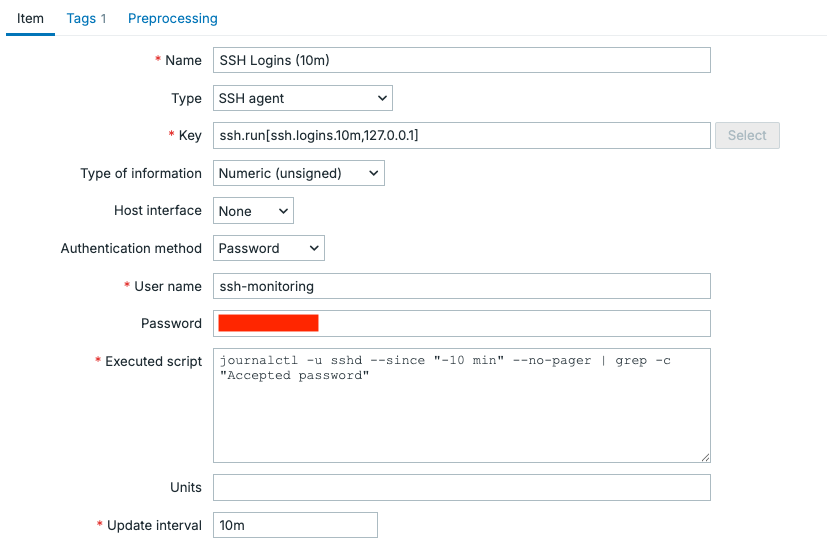
After creating the host, click on Items for this host and then in the top right corner click on Create item. We will set the Type to SSH Agent, which we will need to create SSH based checks. Something you might not expect about this item is that the Key is automatically filled in as:
- ssh.run[
The key for SSH items is built in and we are thus forced to use this key format to make the item work. You can see however we get some key parameters to customise how it works.
: Is used to make this item unique, as we cannot have duplicate keys on Zabbix hosts. : Can we used to specify the target IP Address for SSH to connect to. Can be used if no host interface is specified : Can be used to specify a different SSH port, the default is port 22. : How to decode the remote output, is it UTF-8 or ANSI for example. : In case you have more SSH settings you want to use, these can be set here. For example you could set KexAlgorithms=curve25519-sha256;Ciphers=chacha20-poly1305@openssh.com to force stronger security : If you'd like to force this connection to use a different SSH subsystem to connect into.
As you can see we have a lot of options, but in most cases the unique short description and ip will be enough.
Let's give the item the Key value ssh.run[ssh.logins.10m,127.0.0.1] and also a Name value SSH Logins (10m). Then the trick to making this item works comes along, we need to login using SSH and execute commands.
At Authentication method we will select Password for the example, but you are also able to select Public key as an option here. Going with Public key would allow you to set:
- User name: The user to login as.
- Public key file: The path to the Public key we will use to login.
- Private key file: The path to the Private key we will use to login.
- Key passphrase: The password to decrypt the Private key.
Keep in mind, when using SSH key authentication it is important to update you Zabbix server and/or Zabbix proxy configuration file. You can set the SSHKeyLocation= parameter to for example SSHKeyLocation=/home/zabbix/.ssh/ which will be the path where the public and private keys for SSH checks (and actions) will be located. For example now you can fill in Public key file as ssh-monitoring.pub and it will use the full path /home/zabbix/.ssh/ssh-monitoring.pub.
But as we mentioned let's start with by setting Authentication method to Password. I will set my User name to ssh-monitoring and set a strong secure Password.
Fun
That was a lie, I did in fact not set a secure password as this is only a LAB environment to write examples for this book. But YOU SHOULD set a strong password, especially in production. This is also the reason we use username ssh-monitoring as we will create a separate limited user account for SSH monitoring. DO NOT use root!
Last but not least, let's add the command to execute in the Executed script field.
Executed script for SSH
At the executed script part it is also possible to add multiple commands, which Zabbix will then execute line-by-line within the same SSH session. Another option is to execute an entire script located somewhere on your device. The options are quite endless.
In this case we are executing a command through SSH on a Linux system, simply because it's an easy to explain and setup option. But of course, if I had the Zabbix agent installed on this server already I might as well have used a UserParameter (or remote command if preferred). SSH checks are way more useful on devices where no agent can be installed.
Let's go to our Linux CLI and create the account on our Zabbix server on Linux for testing.
Set that secure password we discussed earlier and then give it limited permissions
Afterwards let's double-check our item configuration, make sure everything is set up correctly.
 4.xx Zabbix CLI Monitoring SSH item
Do not forget to add your tag.
 4.xx Zabbix CLI Monitoring SSH item tag
This should now work as expected and when you navigate to Monitoring | Latest data you should now see a value for this host.
Note
If you are using selinux or a similar security tool, please keep in mind this can block Zabbix access to execute SSH as usual. You should check your audit logs and make sure to allow the SSH connection you'd like to setup. Do not over allow and keep things secure.
Telnet Monitoring
Telnet monitoring works almost in the exact same way as SSH monitoring, except of course the Telnet protocol is used in the background. When we navigate to Items for our cli-monitoring host again, we can click on Create item in the top right corner.
Let's add the item Type as TELNET agent and you will see the Key field already filled out just like the SSH check:
- telnet.run[
The fields are almost the same as SSH, with a few less options.
-
Let's set this one up similar to SSH with the item the Key value telnet.run[telnet.logins.10m,127.0.0.1] and also a Name value Telnet Logins (10m). Of course we also need to specify a command to execute again, so let's add this to the Executed script field.
For Telnet we will also need to specify the User name and Password fields again. Keep in mind, Telnet passwords are sent over the network unencrypted, so once a hacker is in your network the password will be known. If you do still choose to use Telnet for something, still try to set a secure password as this could help against unintelligent scripted attacks, but against a real targeted attack Telnet is useless. Only use Telnet if you make sure the user doesn't have any option to do something malicious on devices you do not care too much about. It really is a last resort monitoring option, so ask yourself is the monitoring worth more than security here?
Again, let's double-check our item configuration, to make sure everything is set up correctly.
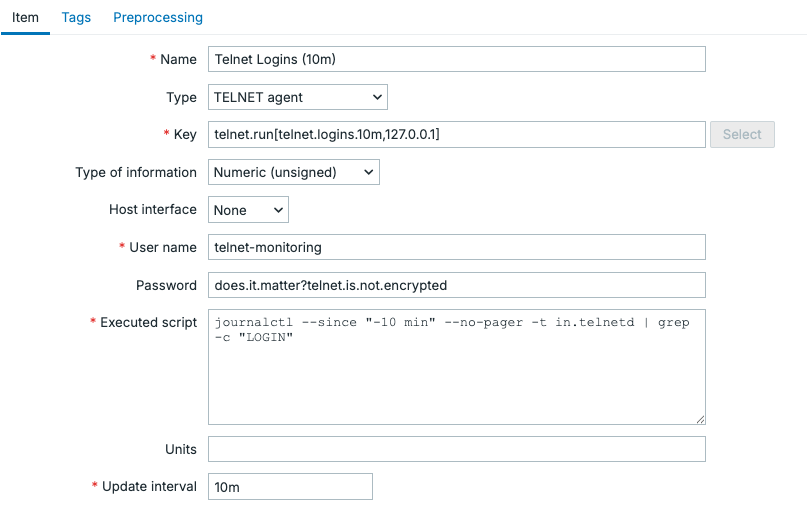 4.xx Zabbix CLI Monitoring Telnet item
Do not forget to add your tag.
 4.xx Zabbix CLI Monitoring Telnet item tag
Then, if you had a Telnet user set up. You can go to Monitoring | Latest data to check if the value is coming in.
Conclusion
SSH and Telnet monitoring provide you with a great fallback when traditional protocols like SNMP or API's simply aren't available. It might also be the case that a vendor hides important information within CLI commands. Using a limited user account, only granted access to specific commands, Zabbix can remotely authenticate and execute CLI commands or even entire scripts to get us raw terminal output that can be used as metrics.
When working with these two options, of course SSH will be the preferred method as it grants us the correct security for modern environments. Telnet should only be used when absolutely all other options are exhausted. In any case, the workflow remains the same in both cases: log in, run a command, preprocess the output, and then use it just like any other metric you have collected.