SAML
Integrating Security Assertion Markup Language (SAML) for authentication within Zabbix presents a non-trivial configuration challenge. This process necessitates meticulous management of cryptographic certificates and the precise definition of attribute filters. Furthermore, the official Zabbix documentation, while comprehensive, can initially appear terse.
Initial Configuration: Certificate Generation
The foundational step in SAML integration involves the generation of a private key
and a corresponding X.509 certificate. These cryptographic assets are critical
for establishing a secure trust relationship between Zabbix and the Identity Provider
(IdP).
By default, Zabbix expects these files to reside within the ui/conf/certs/
directory. However, for environments requiring customized storage locations, the
zabbix.conf.php configuration file allows for the specification of alternative
paths.
Let's create our private key and certificate file.
cd /usr/share/zabbix/ui/conf/certs/
openssl req -newkey rsa:2048 -nodes -keyout sp.key -x509 -days 365 -out sp.crt
Following the generation and placement of the Zabbix Service Provider (SP) certificates, the next critical phase involves configuring the Identity Provider (IdP). In this context, we will focus on Google Workspace as the IdP.
Retrieving the IdP Certificate (idp.crt) from Google Workspace:
- Access the Google Workspace Admin Console: Log in to your Google Workspace administrator account.
- Navigate to Applications: Within the admin console, locate and select the "Apps" section.
- Access Web and Mobile Apps: Choose
Web and mobile appsfrom the available options. - Create a New Application: Initiate the creation of a new application to
facilitate SAML integration. This action will trigger Google Workspace to generate
the necessary IdP certificate.
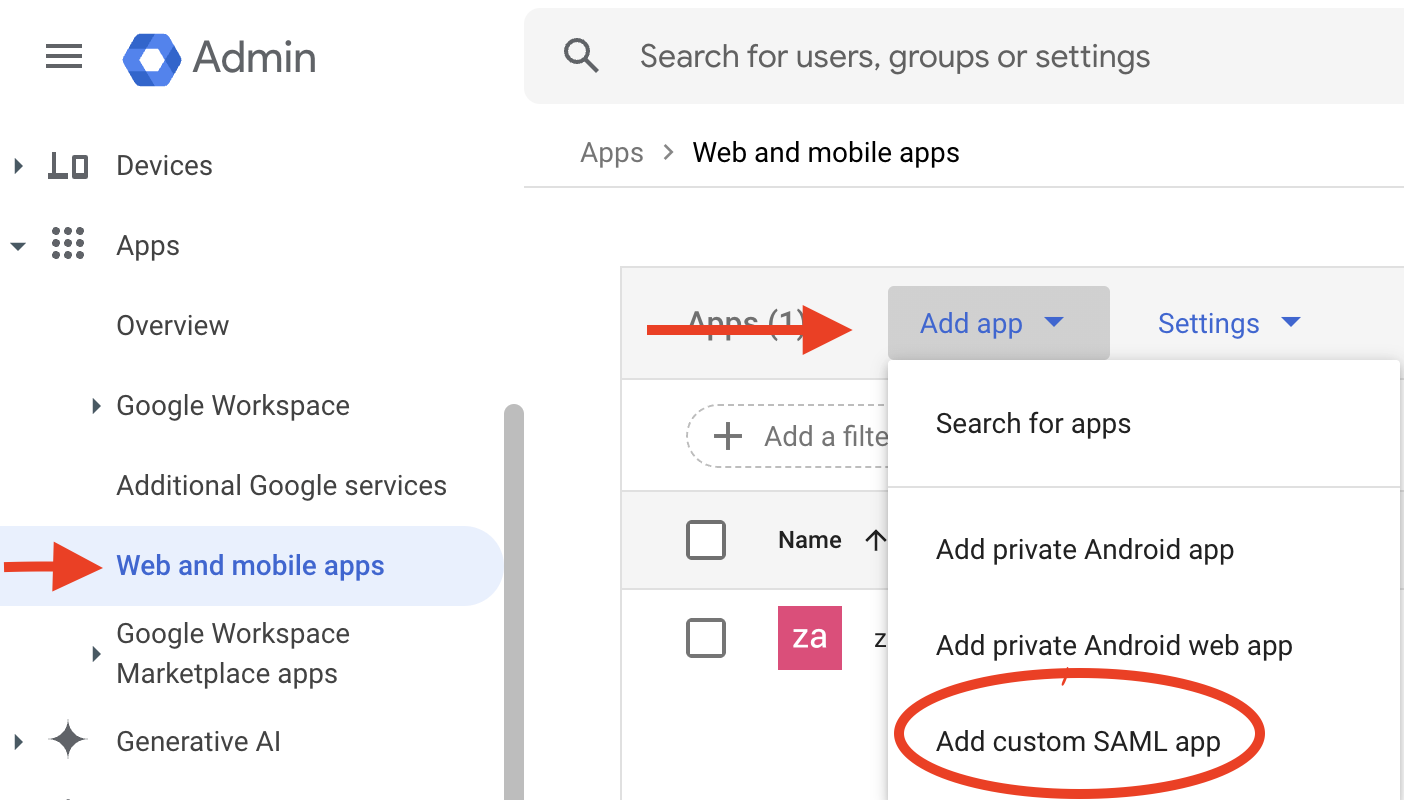
2.16 create new application
- Download the IdP Certificate: Within the newly created application's settings, locate and download the idp.crt file. This certificate is crucial for establishing trust between Zabbix and Google Workspace.
- Placement of idp.crt: Copy the downloaded
idp.crtfile to the same directory as the SP certificates in Zabbix, underui/conf/certs/.
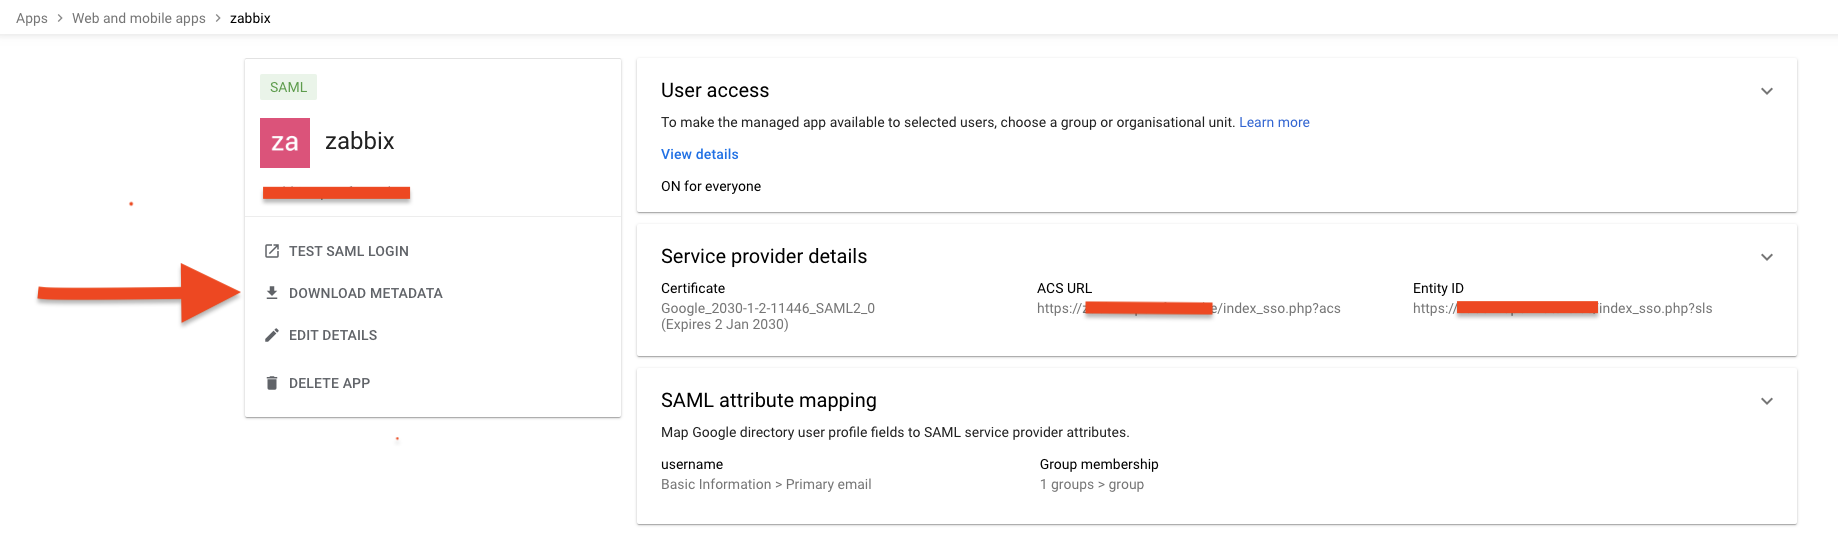
2.17 add certificate
SAML Attribute Mapping and Group Authorization
A key aspect of SAML configuration is the mapping of attributes between Google Workspace and Zabbix. This mapping defines how user information is transferred and interpreted.
Attribute Mapping:
- It is strongly recommended to map the Google Workspace "Primary Email" attribute to the Zabbix "Username" field. This ensures seamless user login using their Google Workspace email addresses.
- Furthermore, mapping relevant Google Workspace group attributes allows for granular control over Zabbix user access. For instance, specific Google Workspace groups can be authorized to access particular Zabbix resources or functionalities.
Group Authorization:
- Within the Google Workspace application settings, define the groups that are authorized to utilize SAML authentication with Zabbix.
- This configuration enables the administrator to control which users can use SAML to log into Zabbix.
- In Zabbix, you will also need to create matching user groups and configure the authentication to use those groups.
Configuration Example (Conceptual):
- Google Workspace Attribute: "Primary Email" -> Zabbix Attribute: "Username"
- Google Workspace Attribute: "Group Membership" -> Zabbix Attribute: "User Group"
This attribute mapping ensures that users can log in using their familiar Google Workspace credentials and that their access privileges within Zabbix are determined by their Google Workspace group memberships.
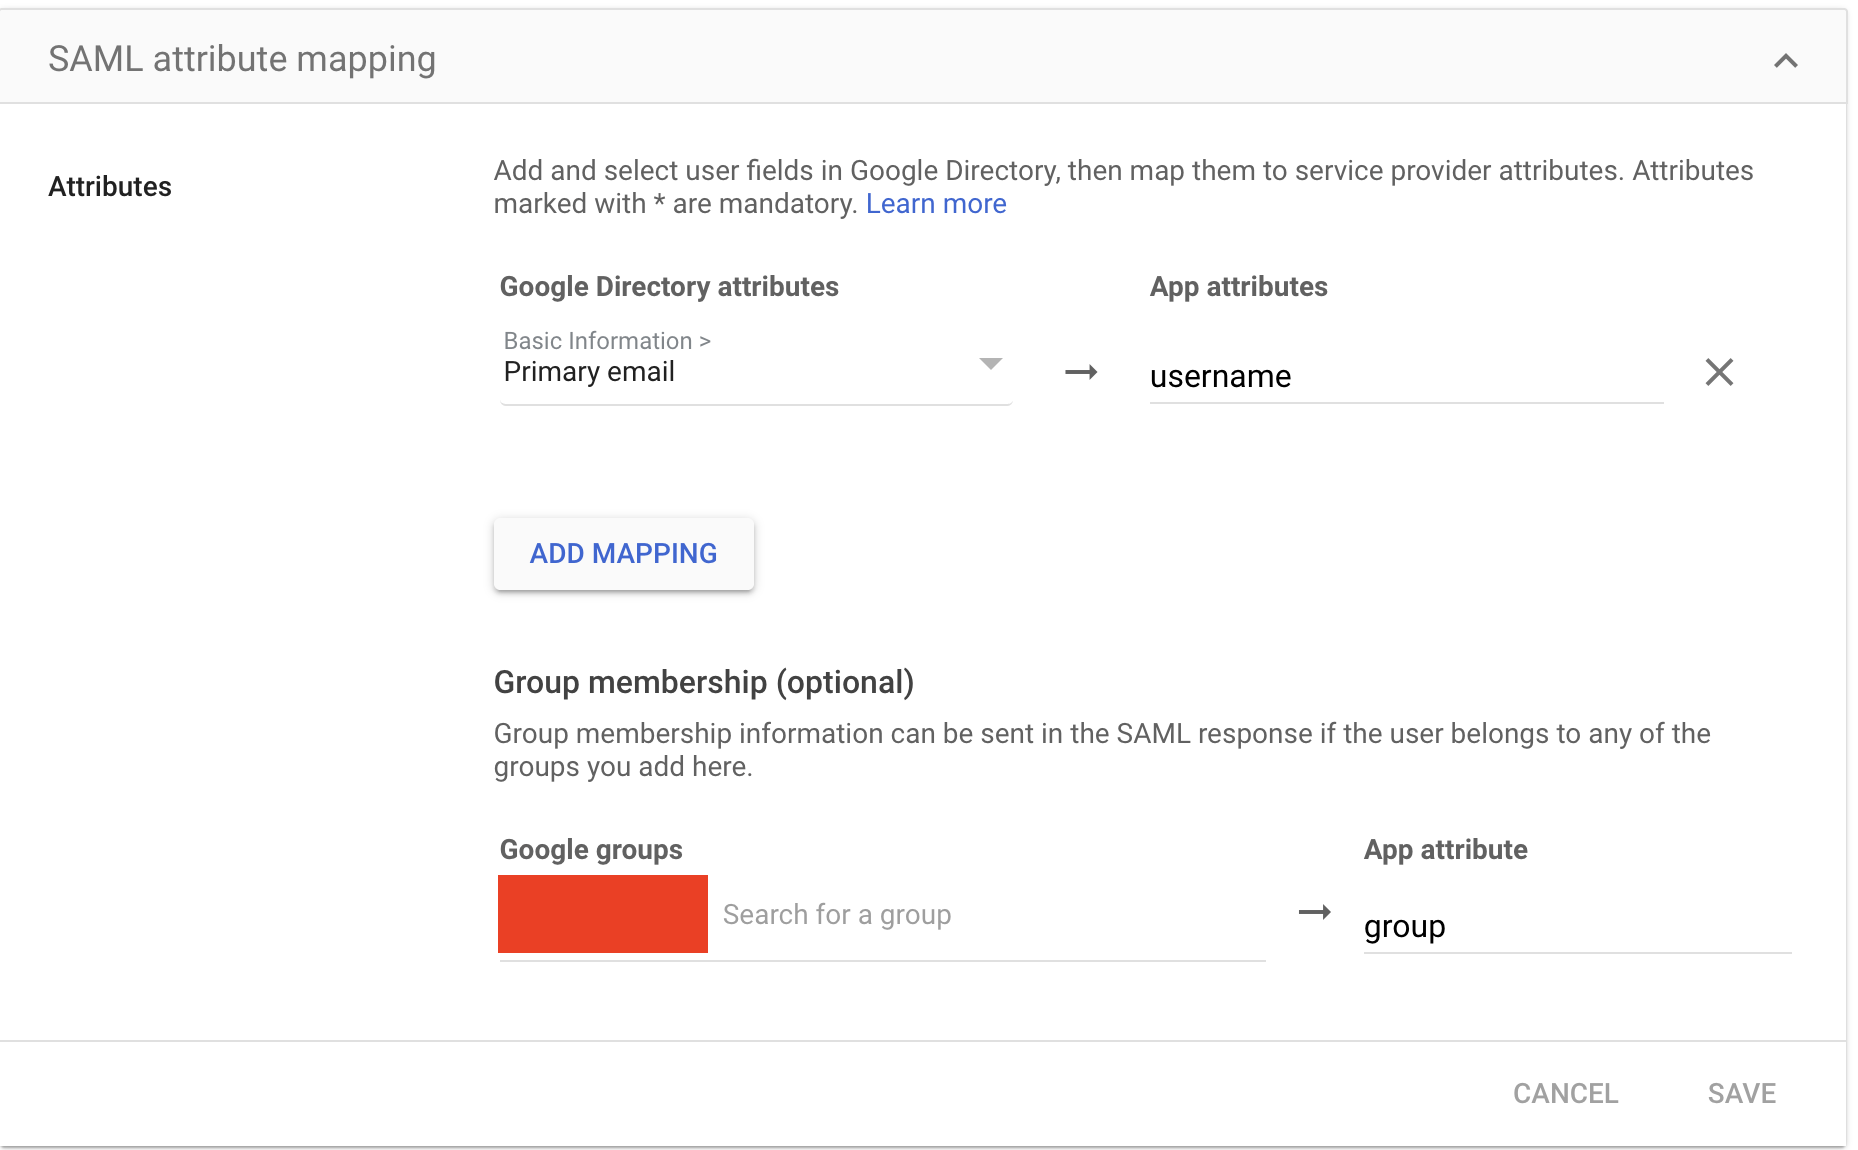
2.18 SAML mappings
Zabbix SAML Configuration
With the IdP certificate and attribute mappings established within Google Workspace, the final step involves configuring Zabbix to complete the SAML integration.
Accessing SAML Settings in Zabbix:
- Navigate to User Management: Log in to the Zabbix web interface as an administrator.
- Access Authentication Settings: Go to "Users" -> "Authentication" in the left-hand menu.
- Select SAML Settings: Choose the "SAML settings" tab.
Configuring SAML Parameters:
Within the "SAML settings" tab, the following parameters must be configured:
- IdP Entity ID: This value uniquely identifies the Identity Provider (Google Workspace in this case). It can be retrieved from the Google Workspace SAML configuration metadata.
- SSO Service URL: This URL specifies the endpoint where Zabbix should send authentication requests to Google Workspace. This URL is also found within the Google Workspace SAML configuration metadata.
- Retrieving Metadata: To obtain the IdP entity ID and SSO service URL, within
the Google Workspace SAML application configuration, select the option to
Download
metadata
. This XML file contains the necessary values. - Username Attribute: Set this to "username." This specifies the attribute within the SAML assertion that Zabbix should use to identify the user.
- SP Entity ID: This value uniquely identifies the Zabbix Service Provider. It should be a URL or URI that matches the Zabbix server's hostname.
- Sign: Select
Assertions. This configures Zabbix to require that the SAML assertions from Google Workspace are digitally signed, ensuring their integrity.
Example Configuration (Conceptual)
- IdP entity ID: https://accounts.google.com/o/saml2?idpid=your_idp_id
- SSO service URL: https://accounts.google.com/o/saml2/idp/SSO?idpid=your_idp_id&SAMLRequest=your_request
- Username attribute: username
- SP entity ID: https://your_zabbix_server/zabbix
- Sign: Assertions
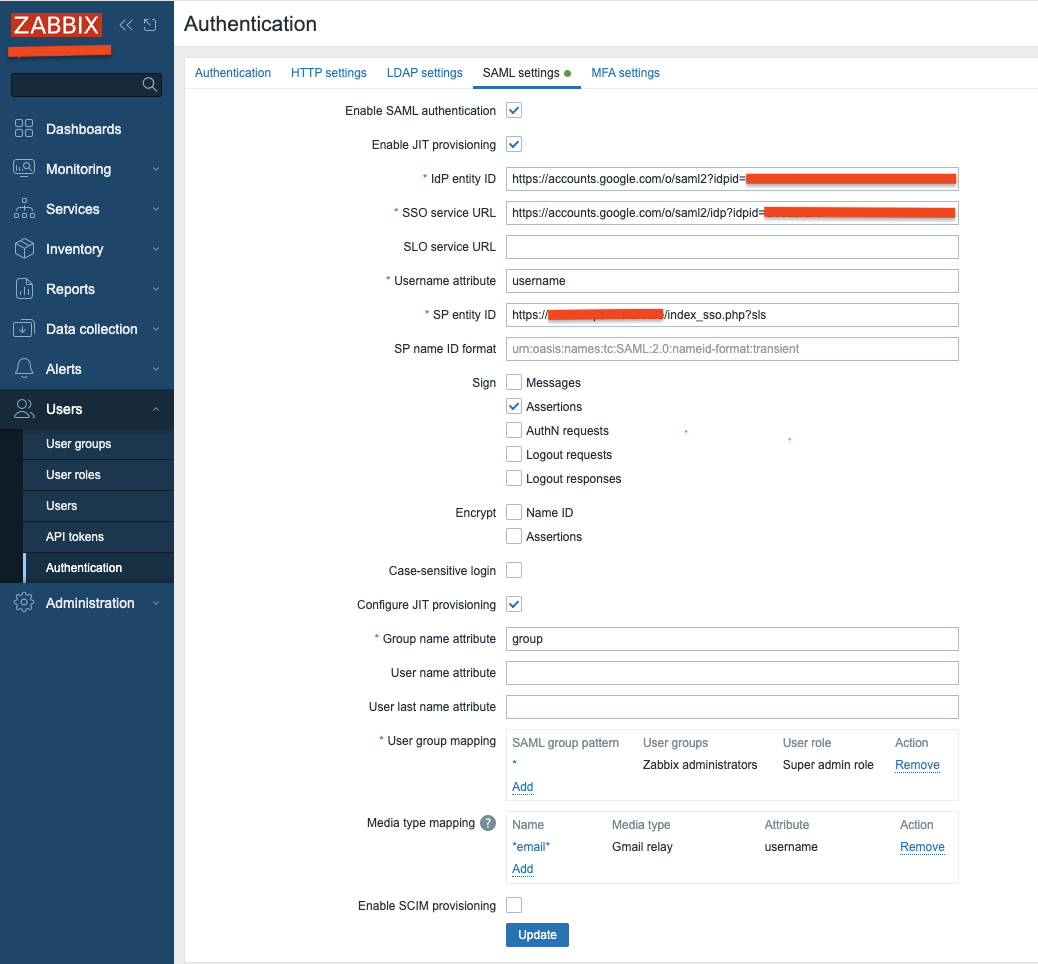
2.19 SAML config
Additional Configuration Options:
The Zabbix documentation provides a comprehensive overview of additional SAML configuration options. Consult the official Zabbix documentation for advanced settings, such as attribute mapping customization, session timeouts, and error handling configurations.
Verification and Testing:
After configuring the SAML settings, it is crucial to thoroughly test the integration. Attempt to log in to Zabbix using your Google Workspace credentials. Verify that user attributes are correctly mapped and that group-based access control is functioning as expected.
Troubleshooting:
If authentication fails, review the Zabbix server logs and the Google Workspace audit logs for potential error messages. Ensure that the certificate paths are correct, the attribute mappings are accurate, and the network connectivity between Zabbix and Google Workspace is stable.
SAML Media Type mappings
After successfully configuring SAML authentication, the final step is to integrate media type mappings directly within the SAML settings. This ensures that media delivery is dynamically determined based on SAML attributes.
Mapping Media Types within SAML Configuration:
- Navigate to SAML Settings: In the Zabbix web interface, go to "Users" -> "Authentication" and select the "SAML settings" tab.
- Locate Media Mapping Section: Within the SAML settings, look for the section related to media type mapping. This section might be labeled "Media mappings" or similar.
- Add Media Mapping: Click "Add" to create a new media type mapping.
- Select Media Type: Choose the desired media type, such as "Gmail relay."
- Specify Attribute: In the attribute field, enter the SAML attribute that contains the user's email address (typically "username," aligning with the primary email attribute mapping).
- Configure Active Period : Specify the active period for this media type. This allows for time-based control of notifications.
- Configure Severity Levels: Configure the severity levels for which this media type should be used.
Example Configuration (Conceptual):
- Media Type: Gmail relay
- Attribute: username
- Active Period: 08:00-17:00 (Monday-Friday)
- Severity Levels: High, Disaster
Rationale:
By mapping media types directly within the SAML configuration, Zabbix can dynamically determine the appropriate media delivery method based on the SAML attributes received from the IdP. This eliminates the need for manual media configuration within individual user profiles when SAML authentication is in use.
Key Considerations:
- Ensure that the SAML attribute used for media mapping accurately corresponds to the user's email address.
- Verify that the chosen media type is correctly configured within Zabbix.
- Consult the Zabbix documentation for specific information about the SAML media mapping functionality, as the exact configuration options may vary depending on the Zabbix version.
Final Configuration: Frontend Configuration Adjustments
After configuring the SAML settings within the Zabbix backend and Google Workspace, the final step involves adjusting the Zabbix frontend configuration. This ensures that the frontend correctly handles SAML authentication requests.
Modifying zabbix.conf.php:
-
Locate Configuration File: Access the Zabbix frontend configuration file, typically located at /etc/zabbix/web/zabbix.conf.php.
-
Edit Configuration: Open the zabbix.conf.php file using a text editor with root or administrative privileges.
-
Configure SAML Settings: Within the file, locate or add the following configuration directives:
// Uncomment to override the default paths to SP private key, SP and IdP X.509 certificates,
// and to set extra settings.
$SSO['SP_KEY']                  = 'conf/certs/sp.key';
$SSO['SP_CERT']                 = 'conf/certs/sp.crt';
$SSO['IDP_CERT']                = 'conf/certs/idp.crt';
//$SSO['SETTINGS']              = [];
Microsoft Entra ID (Azure AD)
Integrating Microsoft Entra ID as a SAML Identity Provider for Zabbix follows the same core principles as other IdPs, but with Microsoft's own structure and terminology layered on top. To get it to work, we will have to do some clicking around in the Microsoft Azure UI.
Configure Entra ID
First, navigate to the the Microsoft Entra admin center. You can type the name in the search bar and it should come right up.
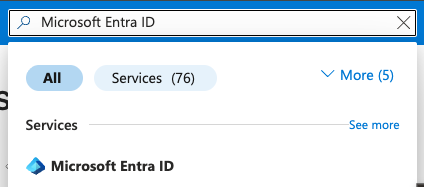
2.x Microsoft Entra ID
Here you should be able to find an add button and then navigate to Enterprise application. This is where we are going to create the SAML integration by clicking on Create your own application.
Choose a simple descriptive name here. My recommendation is to go with something like Zabbix SAML. You will have to use the option Integrate any other application you don’t find in the gallery.
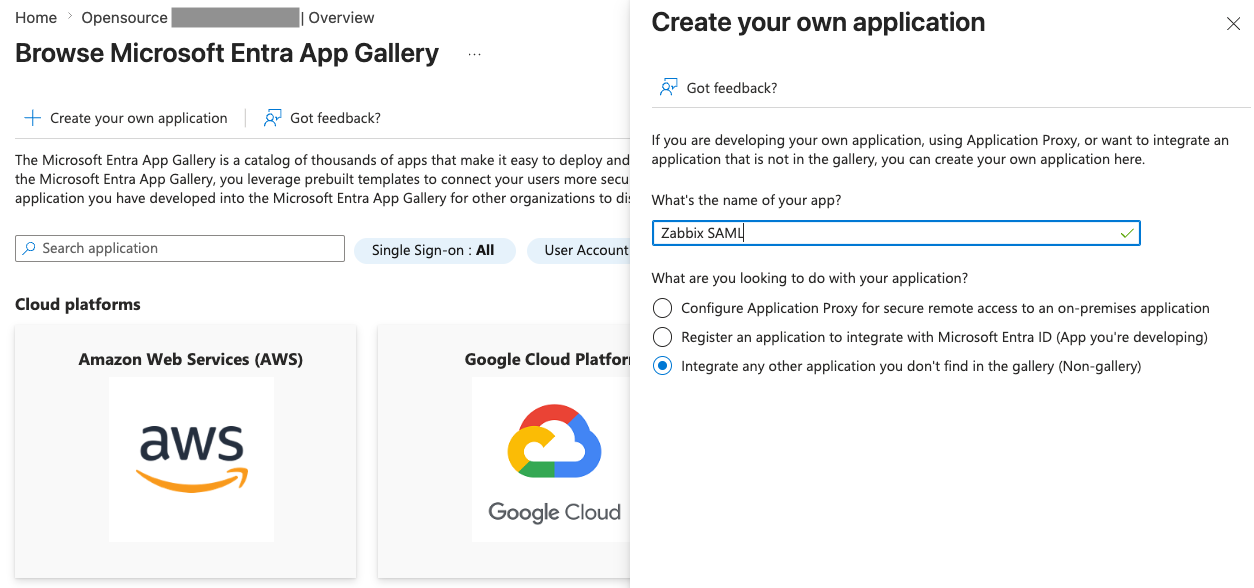
2.x Microsoft Entra ID - Create app
After creating the application, open it and go to Manage | Single sign-on, where you can enable SAML. This should present you with the form to configure all the details needed.
We can now set the Basic SAML Configuration
Configure the following:
- Identifier (Entity ID)
https://your_zabbix_server/zabbix
- Reply URL (ACS URL)
https://your_zabbix_server/zabbix/index_sso.php?acs
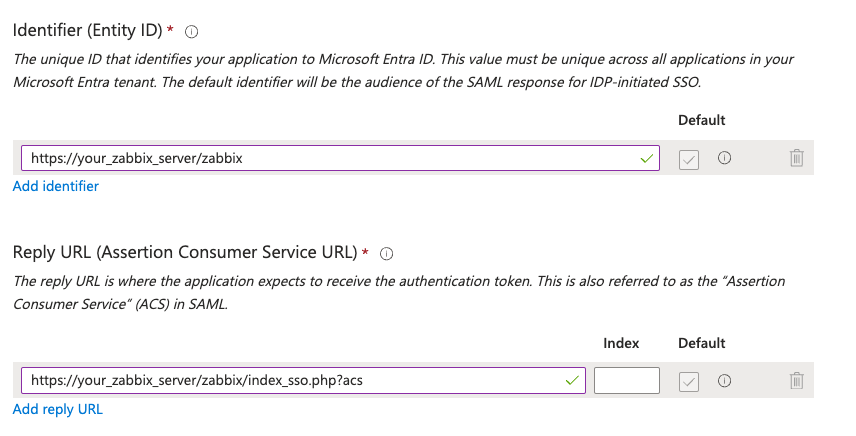
2.x Microsoft Entra ID - Basic configuration
Next, at Attributes & Claims we need to specify some claims. Click Add new claim and add at least the following:
- user_email with Source attribute set to user.mail
- user_name with Source attribute set to user.givenname
- user_lastname with Source attribute set to user.surname
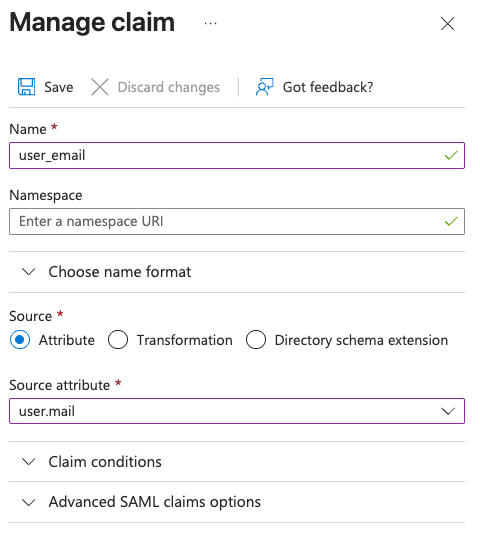
2.x Microsoft Entra ID - Claim
We also need to add click on Add a group claim to make sure our users groups can be sent to Zabbix. Add the following.
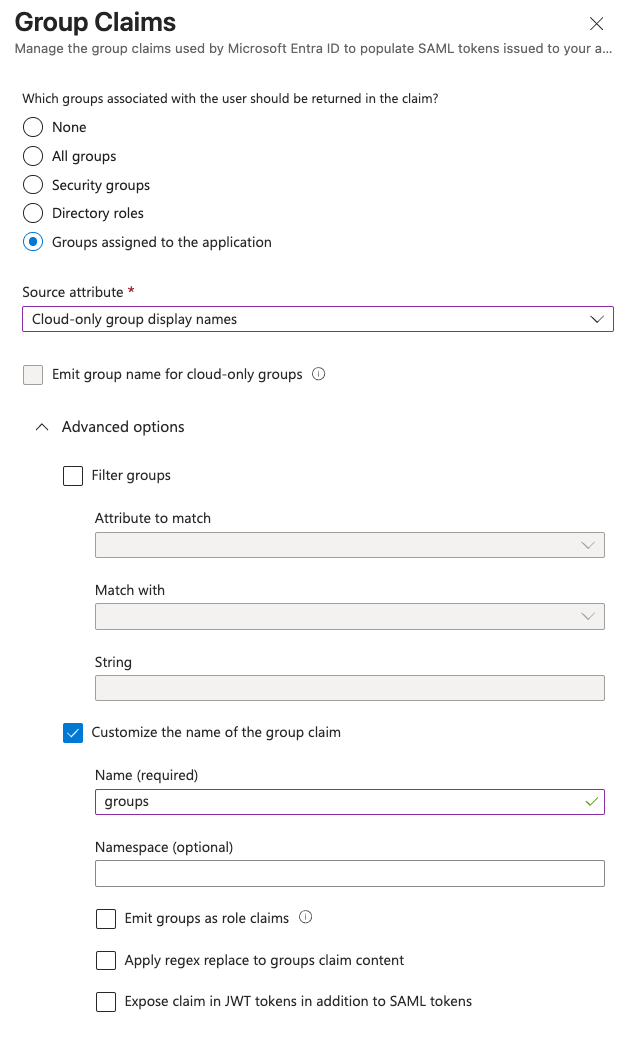
2.x Microsoft Entra ID - Group claims
Now, let's download the Certificate (Base64) under SAML Certificates and save it as idp.crt. Then we upload this to the Zabbix server(s).
The login to the Zabbix server and set the permissions.
While on the Zabbix server, edit the Zabbix web server configuration at ../zabbix.conf.php, usually found in the directory below.
At the part about SAML configuration, make sure to add these two settings.
In the last steps, we can now start the configuration of Zabbix SAML.
Zabbix SAML configuration
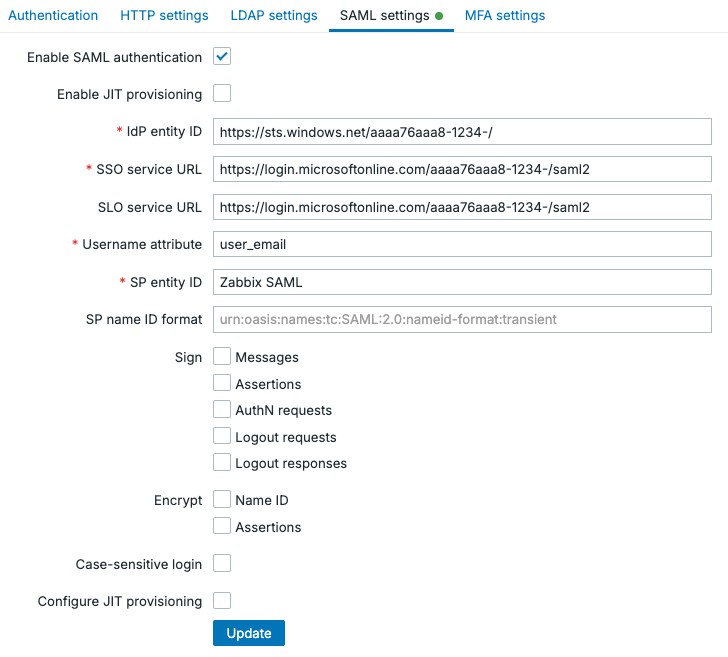
In the Entra ID Application configuration window you should now find the URLs we need to configure Zabbix.

2.x Microsoft Entra ID - SAML URLs
Copy the Login URL as the SSO service URL and SLO service URL. The Microsoft Entra Identifier can go into the IdP entity ID field.
Fill in the Username attribute as user_email and the SP entity ID as the name of your application, in this case Zabbix SAML.
2.x Microsoft Entra ID - Zabbix basic SAML configuration
If you press Update now, I would recommend you to test these settings first.
Note
Keep in mind, for SAML to work at this point, your users will have to be manually created in Zabbix under Users | Users . You will need to make sure their username matches the Username attribute which in our example is the user their email address.
If you'd like to continue the work however and make SAML truly worthwhile, we can Enable JIT provisioning. To configure the setting click on Configure JIT provisioning. We will the fill out the Group name attribute as groups, the User name attribute as user_name and the User last name attribute as user_lastname.
To map the permissions in Azure to permissions in Zabbix, we need to set up the group mappings. At User group mapping click on the small Add button. Fill out your SAML group pattern with the name of your group in Azure. The select the User groups and User roles to assign permissions in Zabbix, like below.
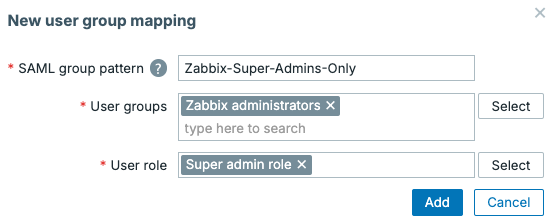
2.x Microsoft Entra ID - Zabbix SAML group configuration
The end result should look something like the image below, but in your environment you will probably add more groups. It is also possible to map certain media types to the user, for example by mapping the user_email attribute to an email media type.
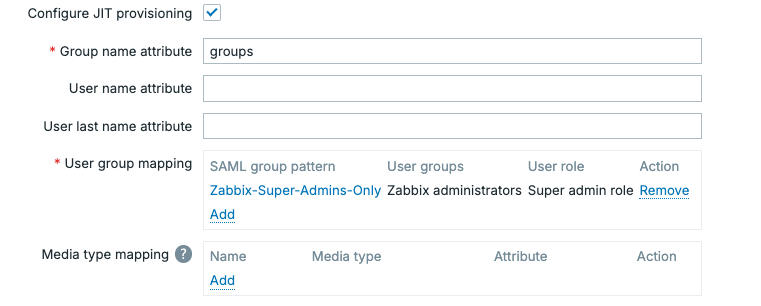
2.x Microsoft Entra ID - Zabbix SAML JIT configuration
Note
With SAML and JIT provisioning enabled, Zabbix will automatically create users on their first successful login. This means you do not need to pre-create users manually.
If you want more control over user lifecycle management beyond first login, that's where SCIM comes in. SCIM allows your Identity Provider (like Entra ID) to continuously synchronize users with Zabbix.
The key difference:
- JIT provisioning: creates users and checks permissions only when the user logs in
- SCIM provisioning: keeps users continuously in sync (create, update and disable, even if they never log in)
SCIM is useful in environments where you want strict control and up-to-date user states without relying on user logins. However, it is not required as JIT already covers the majority of use cases with far less setup complexity.